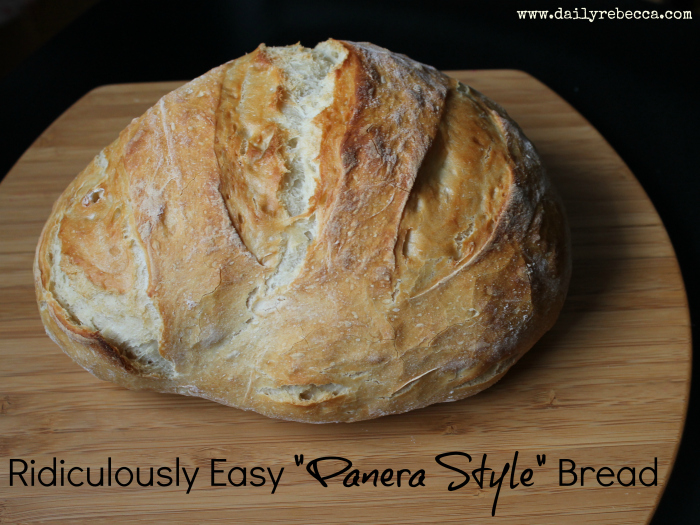
This recipe post is WAY overdue!
I’m not even kidding when I say this bread might change your life.
It’s SO EASY and SO DELICIOUS.
You’ll wonder why no one ever told you that bread THIS GOOD could be THIS EASY.
Unless you already make bread on a regular basis….
in which case you are probably in a serious minority because WHO HAS TIME TO BE MAKING BREAD FROM SCRATCH??
Am I right??
Ok, sorry for all the CAPS. I’m just excited about posting this today (and eating it tonight if I’m being totally honest!).
A few words about this bread:
You don’t have to plan WAY in advance to make it.
You don’t have to knead it!
You don’t have to use a thermometer to activate the yeast!
You don’t have to know what you’re doing because it’s practically fool proof!
It only takes 3 ingredients…

and 3 kitchen tools**

1. Parchment Paper 2. Cast Iron Skillet (or broiler pan) 3. Baking stone (with or without cookie stains LOL)
See?
It really isn’t very complicated…I promise!
And it’s worth every second of effort you put into it. For reals.
I’ve made this bread to accompany a superb turkey chili recipe and a number of incredible soups and it completely steals the show every time. People have a bowl of chili or soup and then they eat about 6 slices of this stuff because they can’t get enough.
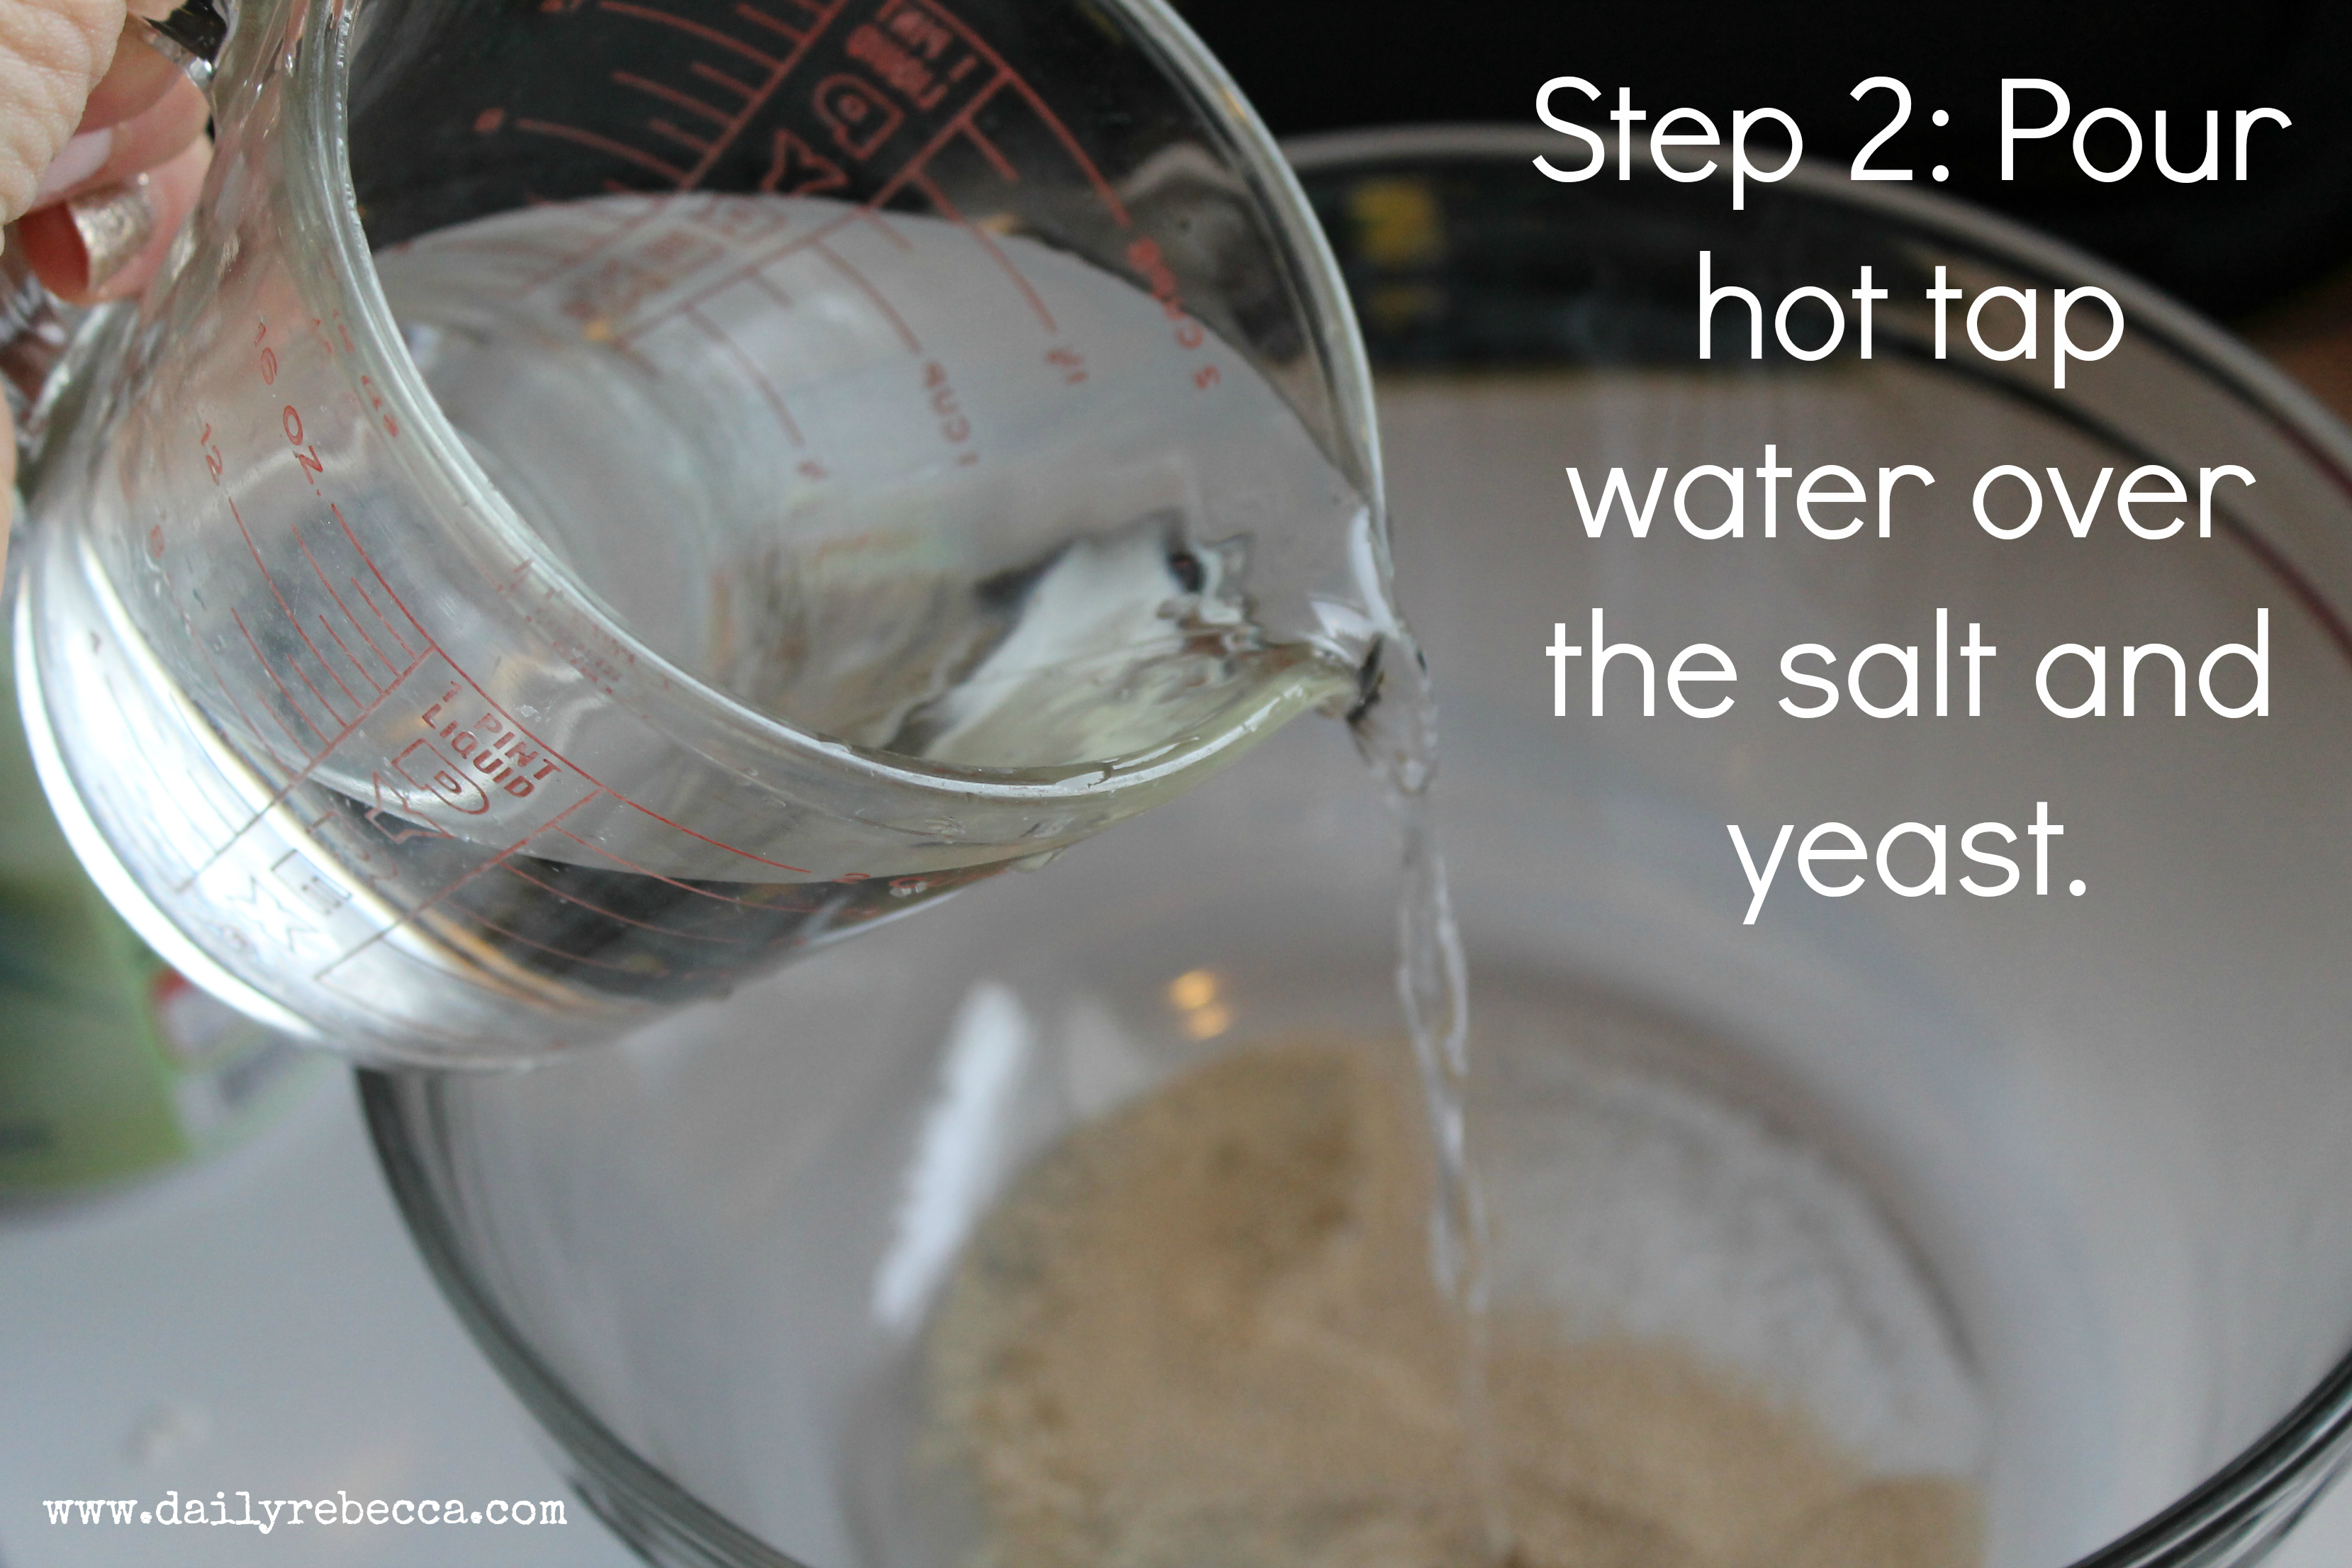
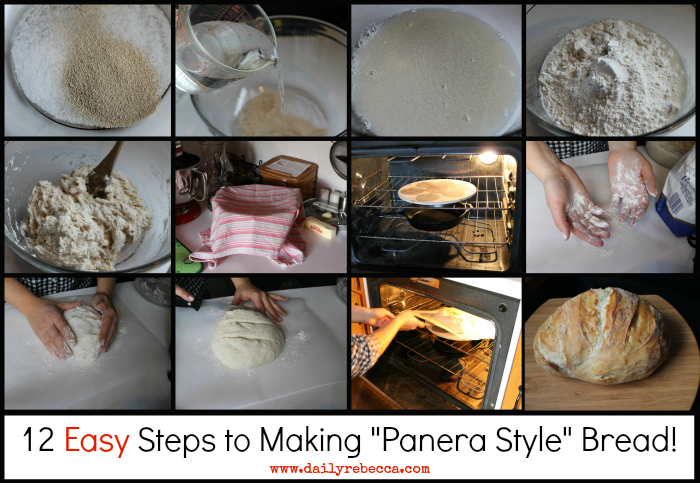
- 1½ cups hot tap water (as hot as your tap will get)
- 1 packet of active dry yeast (not instant)
- 1½ teaspoons salt
- 3¼ cups flour (all-purpose, whole wheat, or any combination of the two)
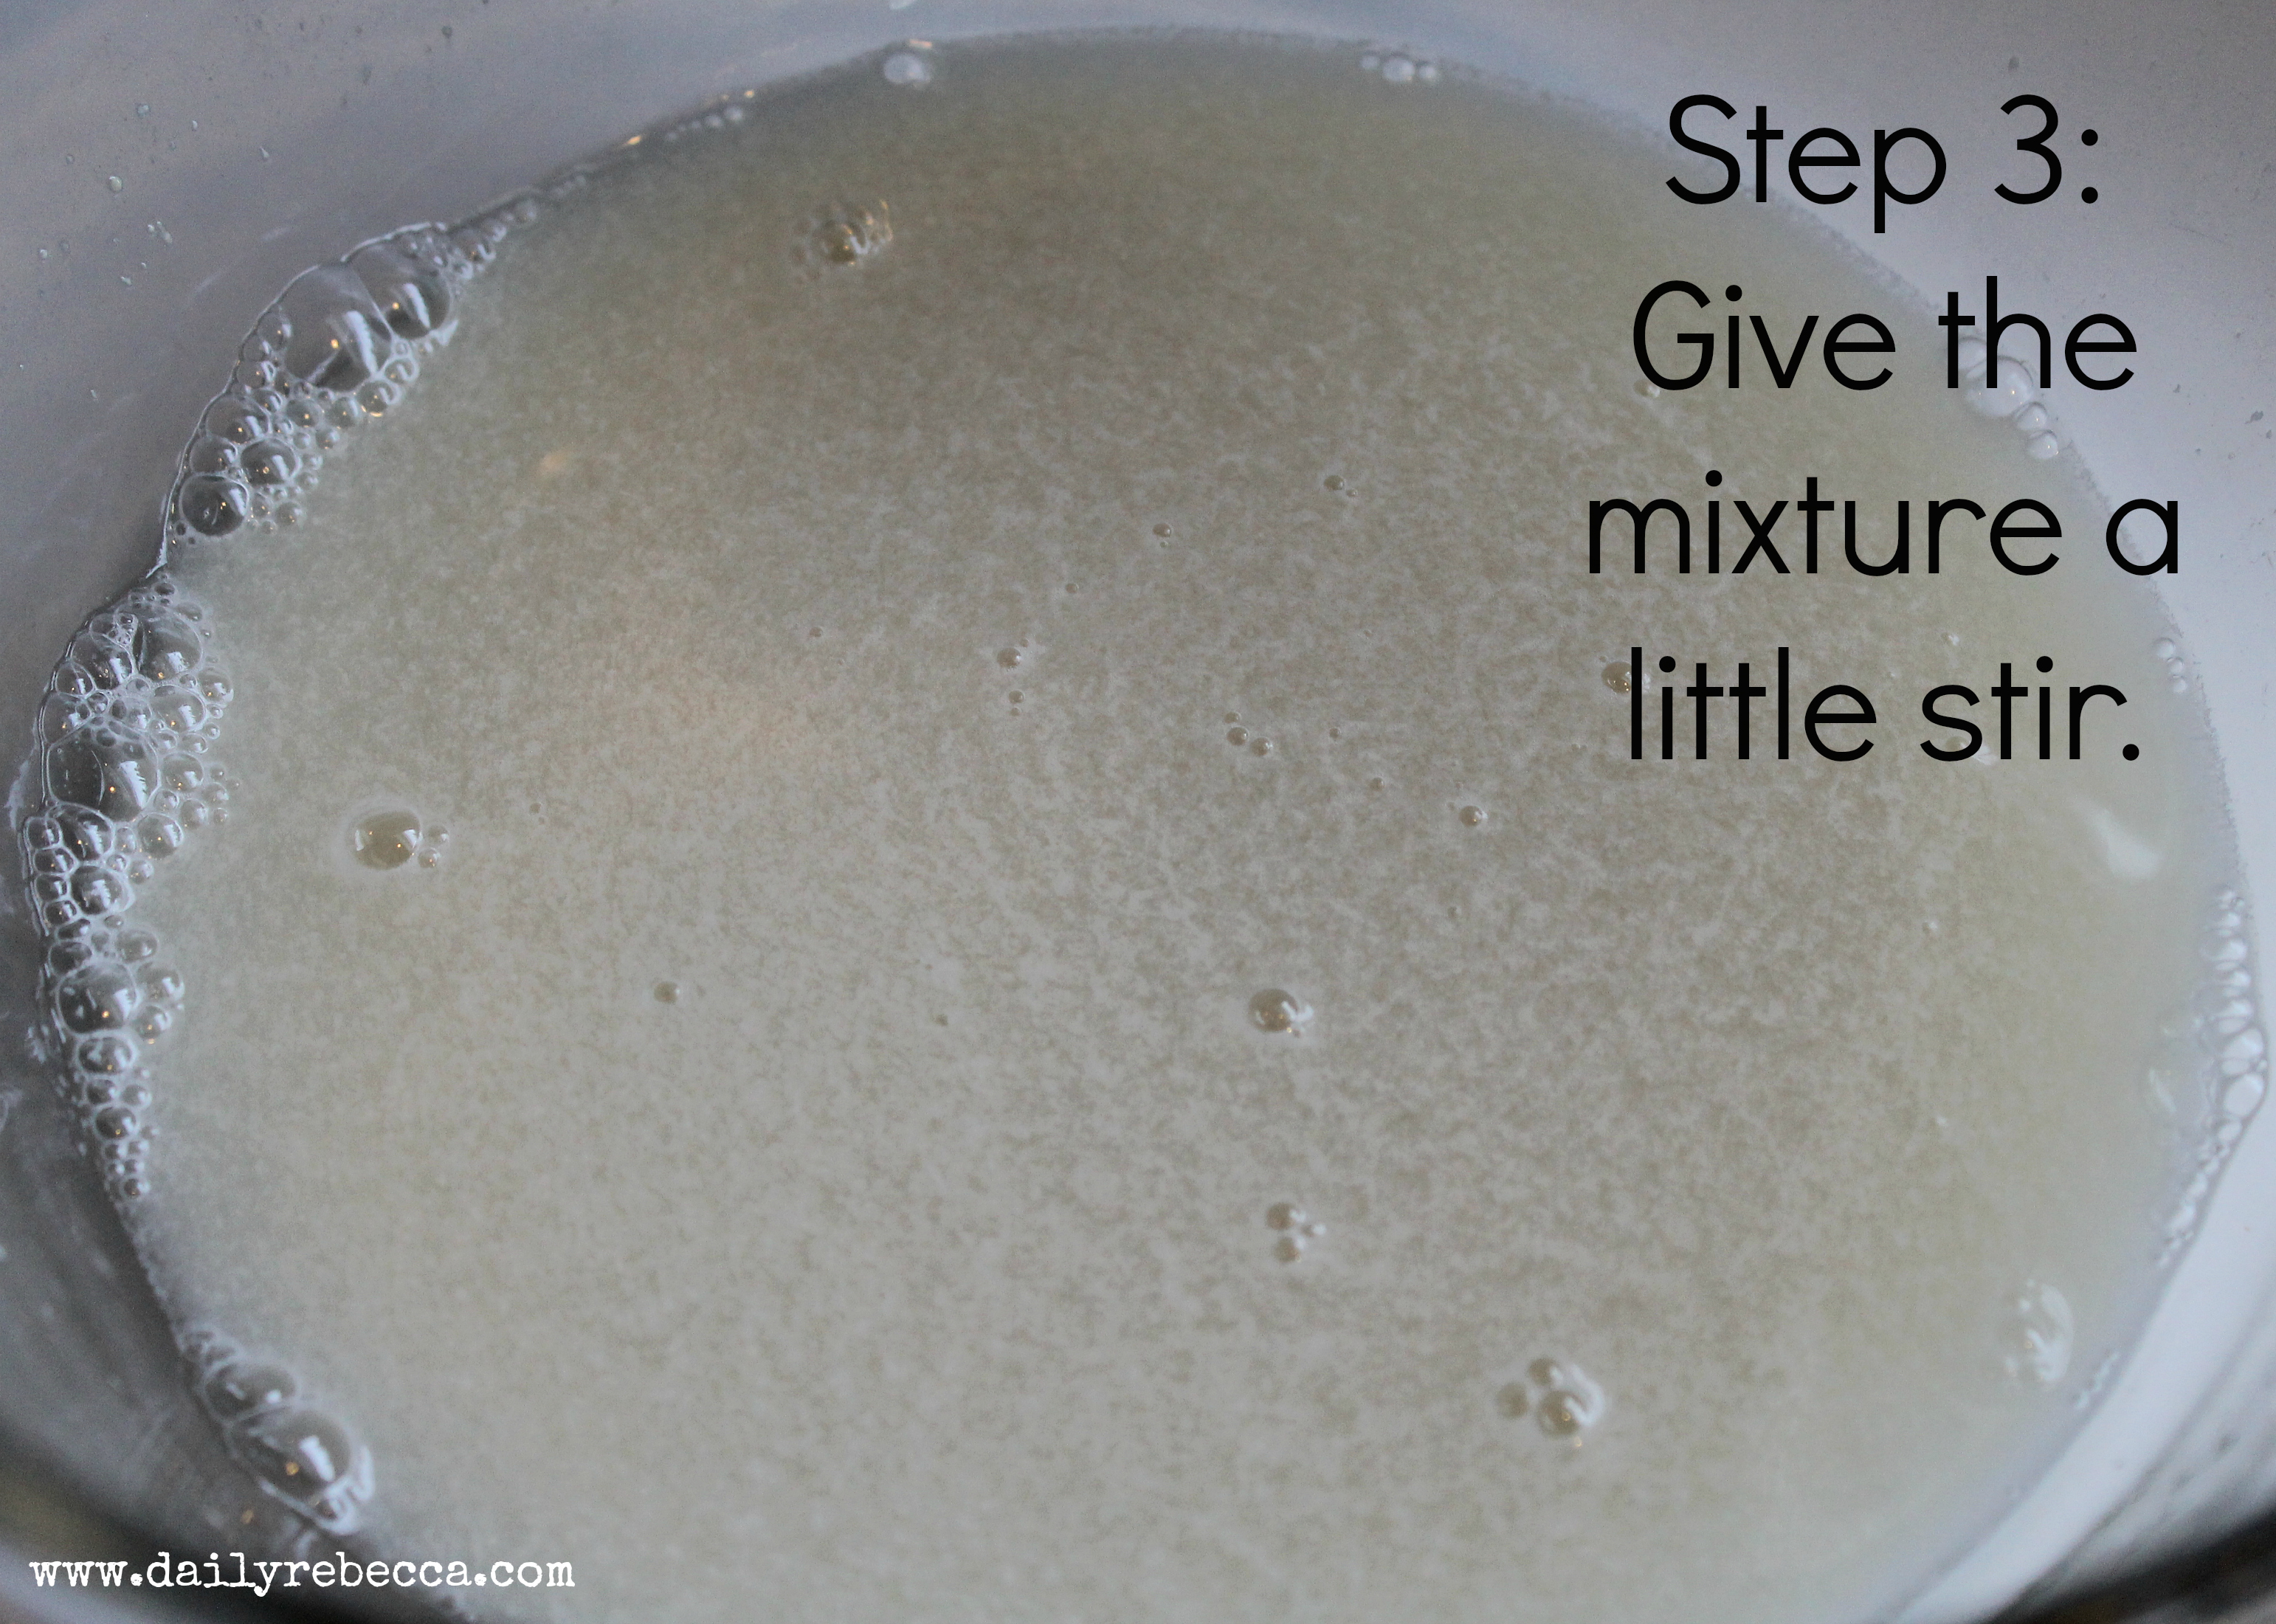
- In a large bowl mix salt and yeast into 1½ cups hot tap water
- Stir in flour, mixing until there are no dry patches. Dough will be loose and sticky. Cover lightly with a kitchen towel but don't seal the bowl airtight. Let the dough rise at room temperature at least 2 hours (up to 5 hours).
- When you're ready to bake the bread, place a cast iron skillet (or broiler pan) on the bottom rack of the oven. Place a baking stone on the middle rack and preheat the oven to 450 degrees. Allow the stone and skillet to remain in the pre-heated oven for 10 or so additional minutes before baking the bread IF YOU HAVE TIME. If not, just make sure the stone and skillet are in the oven the entire time it is pre-heating.
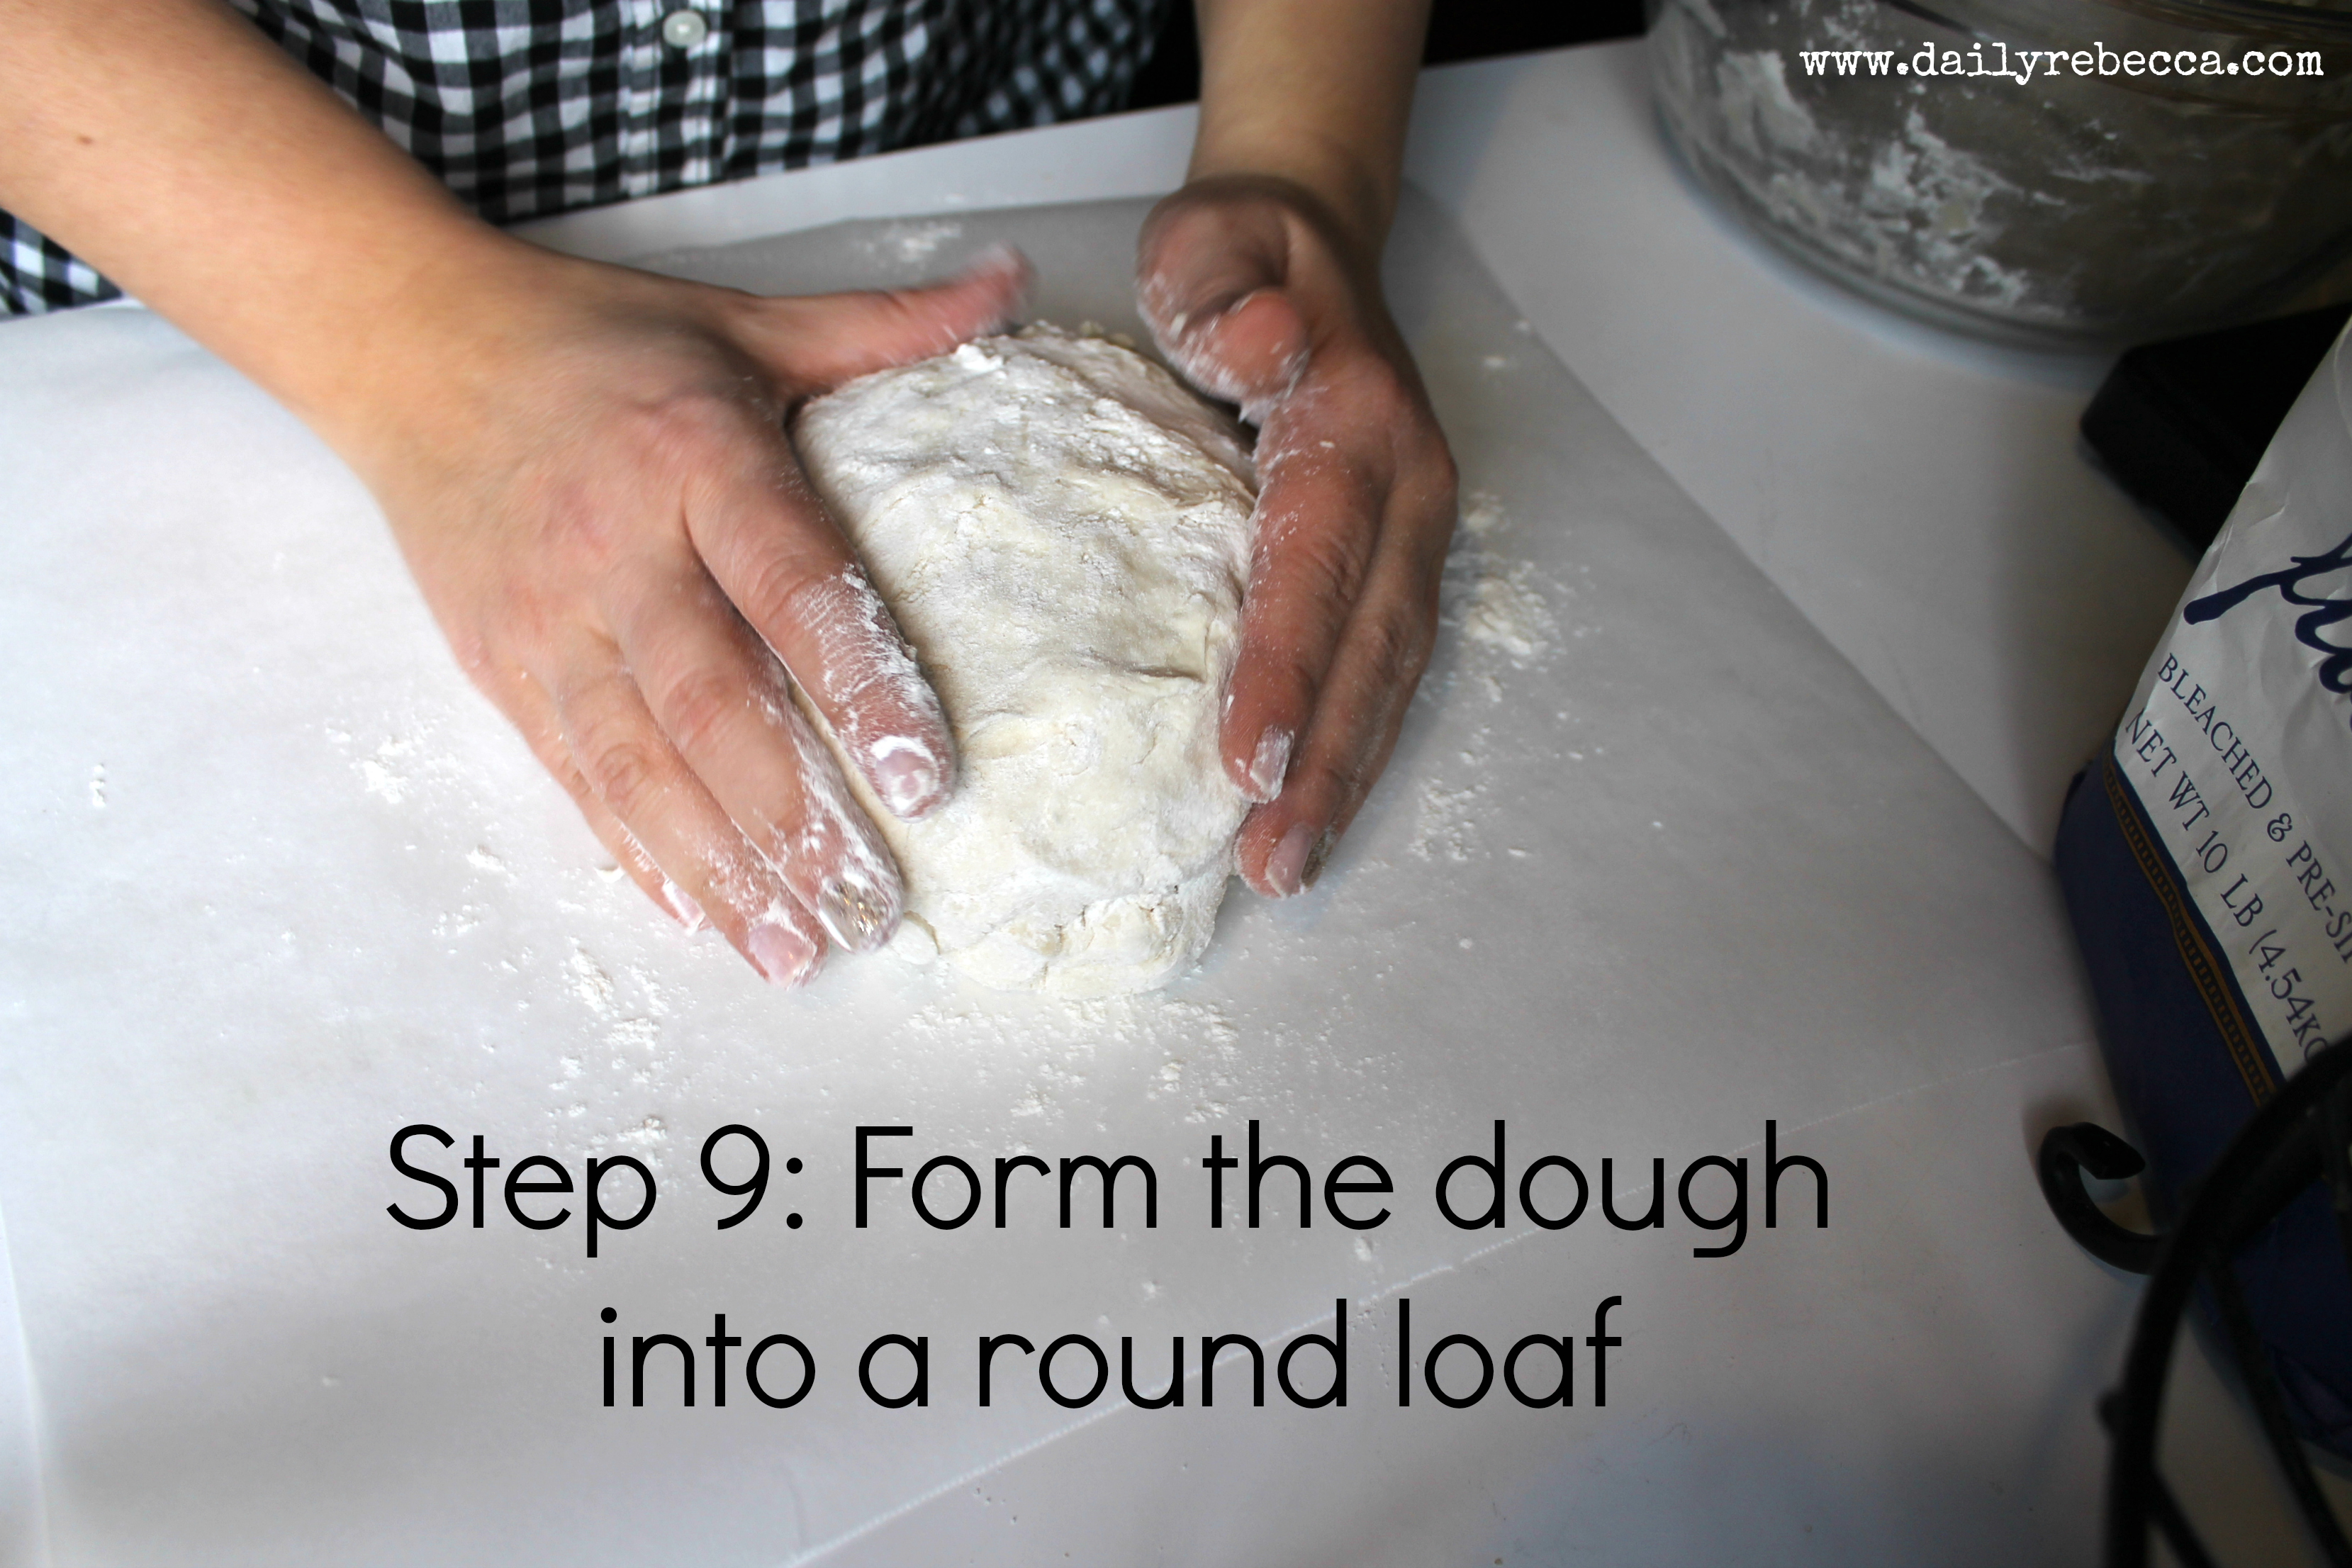
- After the dough has risen, flour your hands lightly and grab the dough out of the bowl. Turn it around in your hands to lightly stretch the surface, creating a smooth, rounded top. The bottom can be lumpy because no one will see it :)
- Put the dough on a piece of parchment paper and, if desired, slice the top with a very sharp knife.
- Using a spatula for assistance, slide the dough (along with the parchment paper) onto the hot baking stone.
- Quickly pour one cup of water into the cast iron skillet (or broiler pan) and shut the oven immediately to trap the steam.
- Bake the bread until well browned, about 25 minutes.
- Cool on a wire rack and enjoy while still warm if you can!
**If you don’t happen to have a stone and/or skillet you can use a rimmed baking sheet upside down for the stone and an oven safe shallow pan for the skillet!


Go ahead and pin this image as a reminder of how easy it is to whip up a loaf of this awesome bread for your next dinner!
How do you get this gooey mess out of the bowl and work it a little? With floured hands and the lightest touch I can employ, it won’t let go of a stainless bowl, clings to my fingers and hands when I work the loaf, and adheres to the parchment paper once laid down. And forget trying to round out the. surface.
I baked this using a cast iron Dutch oven … had to add slightly more water .. but it looks amazing just of the oven. We will see how it tastes!
This was A-MAZ-ING!!!
I brushed 1T of melted butter over the top before I put it in the oven, and only baked for 20 min.
My hubby and daughter both LOVED IT!
The crust has the perfect crunch & the inside is tender & soft.
100% will make this again!
Can this bread be baked in a Dutch oven
I baked it in a Dutch oven and it worked out great!
I bake bread several times a week. I give it away and of course keep some for us. I have to tell you this is the easiest, best bread recipe ever. It is now my go to recipe. I did make the mistake of adding 3 1/2 cups of flour. I just added a bit more water it is was fine. Thanks for sharing it.
I keep trying this and it’s always super dense. My altitude is 7000 ft. Does that affect baking? Just moved here from sea level. Also do you let the yeast water sit for a while and wait for bubbles?
Thanks!
Hi Becky,
If the bread is dense it’s likely because the yeast didn’t activate. Make sure your water is hot enough to activate the yeast but not so hot it kills it. Generally between 105-115 degrees works well. I’m completely unfamiliar with high altitude baking so I can’t help with that unfortunately!
My hot tap water gets pretty hot where it feels like it almost burns my hands hopefully you have a thermometer to check the temperature of the water otherwise it should be like baby bath water but it should definitely be about a 105 to 110 no more than that degrees Fahrenheit
it happens to me I got burnt but the sting is quite tolerable anyway.
105 will kill the yeast, 95 degrees is perfect, add 2 TBS sugar to the yeast and water, let sit 10 minutes before adding flour.
Hello, I notice this recipe says to add the yeast to tap water, “as hot as you can get it.” Our tap water gets soo hot, it can burn your hands. That’s too hot for yeast. I have found a nice warm to hot (you can still touch the water) is perfect. Happy baking.
Don’t let the easiness of this bread fool you .. I have made it several times now and it’s so good! I still can’t believe q bread recipe this easy can be so fabulous! This last time I did half white/half wheat flour and sprinkled with everything but the bagel seasoning before baking ., delicious!!
Wonderful, easy and delicious. Quick question..can you add spices like rosemary or garlic powder? Would love to specialize the bread to the meal.
I just made bread like this today. I put my dough on my kitchen counter overnight or up to 18 hours. Then I proceed but use a dutch oven also. No need for two pans and water, Take the lid off after 40 minutes and bake for 10 more to further brown up the top. It’s crusty and very good.
I did this and it came out fantastic! Thank you!
Amazing recipe! Thank you so much for sharing! ??
I made this bread today and it was delicious! The dough was stickier than I have worked with before but I decided to force ahead. I followed all the instructions and it turned out just like the picture. I’m going to make this all the time now.
It’s very good, simple too, the recipe is a french bread, could never figure out how to get it like there’s until you told me about the steam
I have baked it for 25 minutes as the recipe says and my bread is no where near cooked or browned.
I bake my loaves in an enameled cast iron dutch oven. No need for the pan of hot water if you cover the loaf. Heat the dutch oven at 450 for at least a half hour. Place the dough in the dutch oven, parchment and all. Bake 35 min covered, then remove lid and bake additional 20 min. Mine always comes out perfect. Good luck. I got my recipe, like this one, from Jenny Can Cook website.
Thanks!!
Thank you so much for this suggestion!
I can’t wait to try this recipe. The stores have been out of yeast. I made sour dough with no yeast th as t was good. Do you have a sour dough recipe?
There are some practically ancient sourdough starters on eBay. Search for sourdough starter San Francisco. And also for sourdough plague starter. You’ll like the history of that one. Enjoy!
This yummy and simple recipe has made a pleasure of my stay-at-home-to-avoid- corona-virus. Once a week, I treat myself to a chef salad and fresh loaf of crusty bread. I’ve committed the recipe to memory!
Thanks! It was the easiest bread I’ve ever made. Next time, tomorrow, I’m gonna take it out a few minutes before, 3 to 5. Will probably use a cup and a half to 2 cups for steam.
Love this bread, thank you so much for making it so easy for us?
My family LOVES this bread! It’s super easy and is so good with soups. Thank you so much for sharing!!
First time it was excellent, the second, it didn’t rise, the third still no rise, then I spoke to my sister who shared the recipe with me, she heats her oven to warm, shuts it off and allows it to rise, absolutely beautiful and delicious. Thanks sis and Rebecca.
The dough was way to wet even with floured hands. It is in the oven now. Hoping it turns out OK.
I have not baked it yet, but this dough was very hard to work with. Very very wet and gooey. I bake all the time and followed directions exactly. Right now I am letting it rise before baking. It is spreading out so not confident it will be as high as the photo shows. crossing my fingers. I would not try this recipe again based on my experience. I am giving two stars only because I haven’t baked it yet. Still hoping for a good result. Otherwise one star.
So I baked the bread and as I would expect it did not look like the picture. Was not as high and was a little dense. Don’t get me wrong it looks beautiful and tastes great but not what I hoped for. Even looking back on the photos when flour was added to the yeast mixture. It did not look goopy at all like mine did. Seems like way too much water?! I would research another recipe before doing this one again. Sorry Rebecca but did not meet my expectations!
Obnoxious review 1*
This recipe came out great for me.
can you use alum foil if you don’t have parchment paper
I have not tried aluminum foil, but I make either one large loaf in the large bread pan or two medium loafs in the medium size bread pan. It turns out just the same and I can have a loaf of bread to make toast and sandwiches with. I don’t flour my hands I just use a little cooking spray to get the bread out of the bowl and to Devide the bread. This is a good and very easy recipe. If something doesn’t turn out right then there was to much of something or not enough of the other added. It’s not the recipe. No homemade bread turns out the same everytime. But this is close. So if you fail, make it again. It’s easy to make just get it down pat and you will have good bread almost every time. I find this recipe does really good in bread pans. And when it comes out of the oven it usually looks dry so I brush it with butter and it’s beautiful and perfect.
I think your total time of 30 minutes should include the 2 hours of rise time.
I just made this, and it is wonderful. I do have a few novice questions. Does adding the yeast and salt together serve a purpose. I usually go yeast + hot water wait 10 mins then add flour salt mixed for fear of the salt killing the yeast. Second question should I try to not punch down the rise when making the dough ball on paper. Mine fell some when removing the dough from the bowl. If its not suppose to will oiling the bowl before for easier removal be ok?
There was 1 problem with the bread. The family ate it all before the soup was even done :) next time I’ll make two.
Ha sorry for leaving out all the comas…….P.S Thanks for all your hard work.
I always oil my bowl first for easy removal – works nicely. Also, the dough rise WILL fall when removing it from the bowl, but it rises again during baking. Last, I always thought the same as you about mixing salt with yeast, but I follow this recipe exacty and it’s never been a problem!
This looks divine &my mouth is already watering at the thought! I’d like to divide & make bread bowls for soup. Can you advise how many portions to cut this into & how to alter the baking accordingly?
How hot should the water be if you don’t trust or can’t get your tap water to get hot?
Made this last night. Was terrific. Jubilee couldn’t get enough. Well, none of us could! So nice to have a “busy moms” bread, almost as easy as a bread machine, and faster! Thank you Rebecca!
This is so awesome and so simple
Emily, I’m glad you enjoyed it! :)
I love this bread! My husband saw me pour water into the pan underneath and was shocked, but it really is the secret to make that nice crust!
Thanks! I usually use water between 110-120….our hot water tank is set at 130., so I didn’t want to kill the yeast vs activate it.
I so enjoy your blog…I’m older than you, but so resonate with your struggles and your walk with God. Thank you for sharing your life….and your recipes! (I loved the Cranberry Christmas Cake. ;D. )
It looks fabulous. I have made no-knead bread before, but have always had it pounded in my head that hot water kills yeast. It doesn’t look like it was in issue in this case. No one has had issues??
Hi Deanie! Thanks so much for taking time to leave a comment :) The deal with yeast is that the water has to be hot enough to “activate” it, but not so hot that it kills it. In my Sweet Buttery Yeast Rolls recipe, I have to use a thermometer to get the water between 120-130* for them to rise properly, but regular old hot tap water works for these. I think cool or lukewarm water wouldn’t activate the yeast. Hope that helps!
My tap water is over 150 which I’m quite sure will kill all the yeast, so beware
This looks so dang good.. I think I would make it just because it is sooo pretty! :) I am totally trying this..One one sad thing. I need to buy a cast iron pan and a baking stone :( Just when I thought I had it all :(
You should! And if you have a rimmed baking sheet, you can turn it upside down and use it in place of the stone. Any shallow, rimmed baking dish that can withstand high heat and not risk cracking when cool water is poured in should be fine in place of the cast iron skillet…maybe a metal pie pan if you have one??
Looks INCREDIBLE! No need for a gluten cloak?? If not…have to try this one ASAP!!!
I’ve never heard of a gluten cloak…do tell!
A gluten cloak is formed when your stretch the top of the dough smoothly to the bottom of itself. It is what gives your bread the crunchy crust using the water pan underneath while baking. Take a look at this 36 second video: http://www.artisanbreadinfive.com/2010/02/16/new-video-how-to-shape-a-loaf-using-whole-grain-dough
I believe you made a gluten cloak when you shaped your loaf…that’s why it looks so INCREDIBLE!!! (an example of “unconscious competence…you don’t even have to think about it because you love, and are so good at, what you do!)
Got the oven heating to 450 degrees at 10:20pm… been waiting for the dough to rise for 2+ hours. Getting ready to put a “gluten cloak” on that bad boy. Can’t wait to see what happens NEXT!! Let you know in about 25 minutes!!!
OMGosh! My loaf of bread looks just like YOURS!! and it tasted INCREDIBLE. After reading and re-reading your article, I found that you DID “smooth” the top of the loaf; which some call a “gluten cloak.”
I also found, that after smoothing the top, I should have left it “rest” for about an additional 90 minutes on the parchment paper before slicing the top and putting it in the oven. Like you mentioned… that would probably produce a less dense loaf.
But… not only was mine DELICIOUS warm out of the oven with butter slathered all over it, it made INCREDIBLE toast this morning!
Thank you for a QUICK and EASY way to have DELICIOUS bread any time!!!
This bread is amazing and feels like it’s from a fancy bread store!